Guestpost: An alternative way to sew the Foliis
Guestpost by Miranda from Inspinration.
On Monday the Foliis was released. I really love the pattern and I actually sewed three garments with it during testing. I did change the constructions a bit though. I added a bias finish to the zipper and sewed the entire neckline with my sewing machine (instead of hand stitching the lining). In this post I will tell you how I did it.
Afgelopen maandag lanceerde Sofilantjes de Foliis. Ik ben helemaal weg van dit veelzijdige patroon en maakte tijdens het testen al meteen drie exemplaren. Ik week qua constructie echter wel een beetje af van de instructies van het patroon. Ik naaide namelijk een biasbandje als afwerking op de rits aan de binnenzijde en ik naaide de gehele halslijn op de naaimachine. Ik hoefde daardoor alleen een klein keergat met de hand dicht te naaien. In deze blogpost laat ik jullie zien hoe ik deze dingen deed.
- Zipper with bias
The first thing that I am showing you is the bias finish zipper. This step can also be done on a neckline, like with the Semper, to hide a seam. You of course need a piece of bias, I always sew/cut my own, but you can use a store-bought one as well. The zipper is not stretching, so you can just use a woven bias. I prefer to combine as many steps as possible, and avoid pinning (I am all for efficiency and speed). So, in the pictures I am showing you the quickest way, you can also do this in smaller steps though.
Het eerste wat ik laat zien is de rits afwerken met bias band. Deze bias band methode kan je trouwens ook toepassen bij het extra netjes afwerken van een halsnaad, zoals bijvoorbeeld bij de Semper. Ik gebruik altijd zelf gemaakte bias band, maar je kan natuurlijk ook werken met bias band van de winkel. Voor het afwerken van de rits kan je prima niet rekkende bias band gebruiken, aangezien de rits ook niet rekt. Ik houd ervan om zoveel mogelijk stappen in één te doen en waar mogelijk speld ik dan ook niet. In de foto’s zie je mijn ultrasnelle methode, maar je kan het ook met wat meer tussenstappen doen natuurlijk.
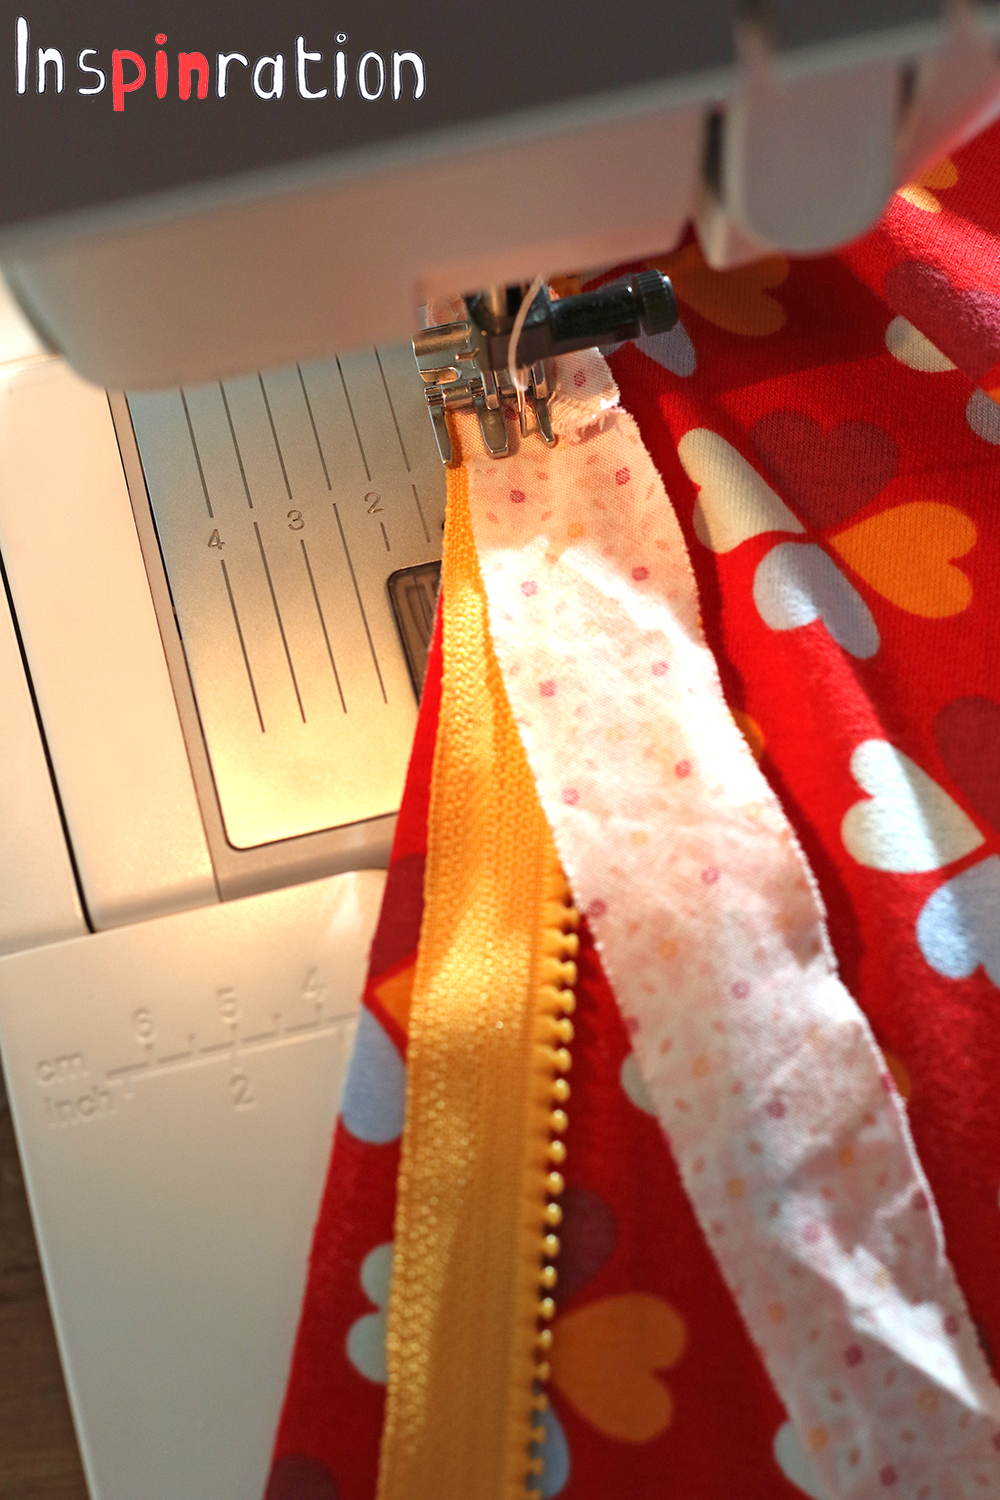
In the super fast way, you just put a piece of bias with the right side down, on top of the zipper, in the step that you are sewing the zipper (step 2 for the jacket, step 23 for the short jacket and step 36 for the dress). Sew the bias in one go together with the zipper. A less hurried version is first pinning the zipper, sewing the zipper and then pinning your bias and sewing it on the zipper.
Met de super snelle methode leg je een bias band strip op de rits (met de goede zijde naar de rits) als de handleiding zegt dat je de rits gaat naaien (stap 2 voor het lange jasje, stap 23 voor het korte jasje en stap 36 voor de jurk). Naai de bias band dan tegelijk in dezelfde stap vast als de rits. In een minder haastige versie speld je de rits, naai je de rits, speld je de bias band en naai je de bias band.

Flip the sewn bias with the right side up, than it should look like this, already much prettier right?
Klap de bias band om zodat de goede kant boven ligt, zo ziet het er al een stuk mooier uit toch?


Fold the excess bias under your zipper and pin in place (yes, now even I pin). These are two pictures from both inside and outside after pinning.
Vouw de extra stof (wat uitsteekt naast de rits) onder de rits en speld het vast (zelfs ik speld bij deze stap). hierboven zie je twee foto’s van hoe het er dan uitziet, eentje van de buitenkant en een van de binnenkant.
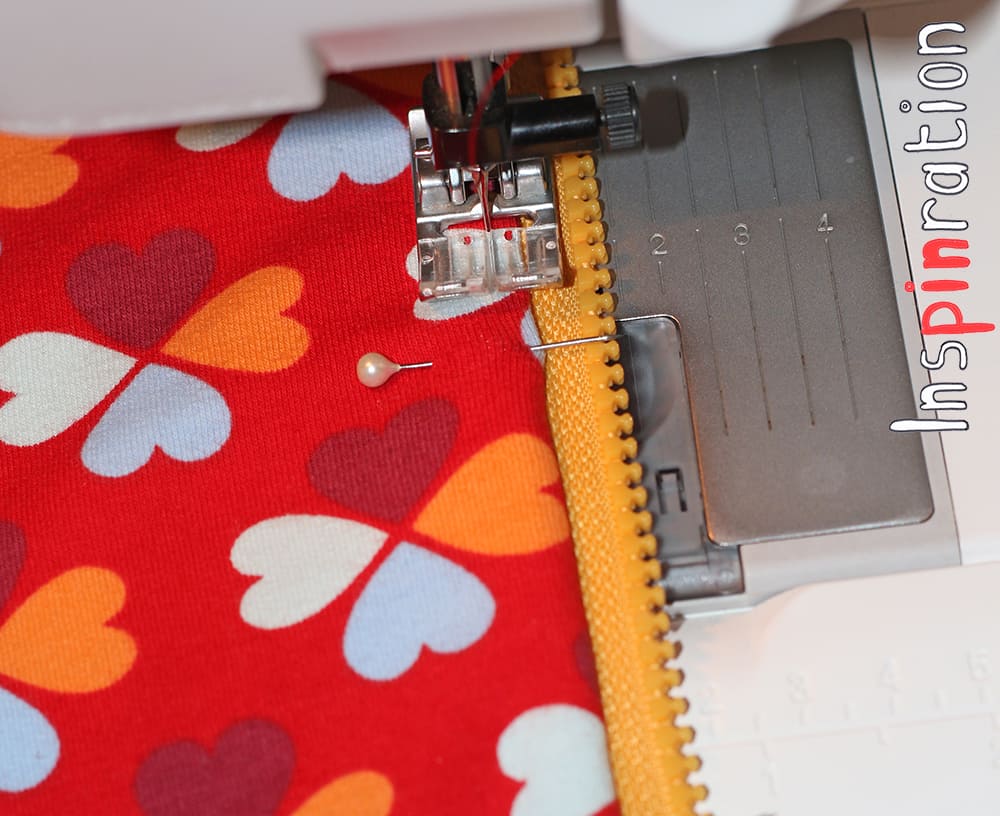
Top stitch the zipper, without stretching it (use a long stitch), and you are done (top stitching is done in step 12, 28 and 42 in the instructions, so you can wait until that step do do the actual stop stitching). For the third Foliis that I made, I doubled the front bodice. This way the zipper was nicely enclosed between the lining and the main fabric. Sewing a lining, is just like sewing on a bias. When you sew the zipper on the outside bodice part (again step 2, 23 or 36), just lay the lining (with the right side down) on the zipper like I did with the bias.
Naai vervolgens een topstitksel, zonder de stof te rekken (gebruik hiervoor een lange steek). Volgens de handleiding maak je het topstiksel in stap 12, 28 of 42, dus je kan ook wachten tot je bij die stap bent. Bij de derde Foliis die ik maakte, gebruikte ik nog een iets andere methode. Ik gebruikte tricot, wat net iets dunner is dan sweat, dus ik knipte een voering voor de voorkant (gewoon hetzelfde patroonstuk als het voorpand). Ik verwerkte de rits vervolgens tussen voorpand en voering. De methode is hetzelfde als bij de bias band. In de stap dat je de rits hoort te naaien leg je het voeringsdeel (wat je ook verstevigd hebt) gewoon op de rits met de goede kant naar onder.

2. Machine stitched neckline
The second thing that I am showing you is how you avoid the hand stitching as much as possible and how your neckline looks like if you do not shorten the zipper with an official stop.
Het tweede dat ik laat zien is hoe je het naaien met de hand tot een minimum kan beperken. In één moeite zie je ook dat je ervoor kunt kiezen om je rits niet in te korten met een ritsstopper.

Sew the hood as instructed, but leave a turning hole in the lining. About 8 centimeter should be enough. You can see my turning hole on the left side in the hood. Lay down your dress and hood as I did, such that you easily see which side should be connected to which side.
Naai de kap zoals in de instructies, maar laat een keergat in de voering open. Zo’n 8 centimeter zou genoeg moeten zijn. Op bovenstaande foto zie je het keergat aan de linkerzijde. Leg nu je jurk/vest en kap tegen elkaar zoals op de foto. Op deze manier zie je namelijk makkelijk welke delen je straks aan elkaar moet naaien.

Now pick up the dress at the top of the left side of the zipper (it really does not matter which side you take, just make sure you take the same hood side). Now take the left side of the hood and fold the sides over the zipper like in the picture. The unfinished sides should be on each other. The zipper should be placed as close to the previously sewn hood seam as possible. The zipper is sandwiched between main and lining fabric of the hood. Pin in place (really, use pins here).
Neem nu de bovenkant van de rits van de linkervoorzijde in je hand (het maakt echt niet uit of je nu links of rechts pakt, zolang je in de volgende stap maar de juiste kant van de kap gebruikt). Neem nu de linker voorzijde van de kap en vouw die om de rits zoals op de bovenstaande foto. Het idee is de reeds genaaide naad van de kap tegen rits zit, tegen de tanden. De rits hoort nu echt tussen de buitenstof en de voeringsstof in te zitten. De af te werken neklijn van de jurk/vest en de kap moeten ook op elkaar liggen. Speld vast, echt waar, gewoon doen hier.

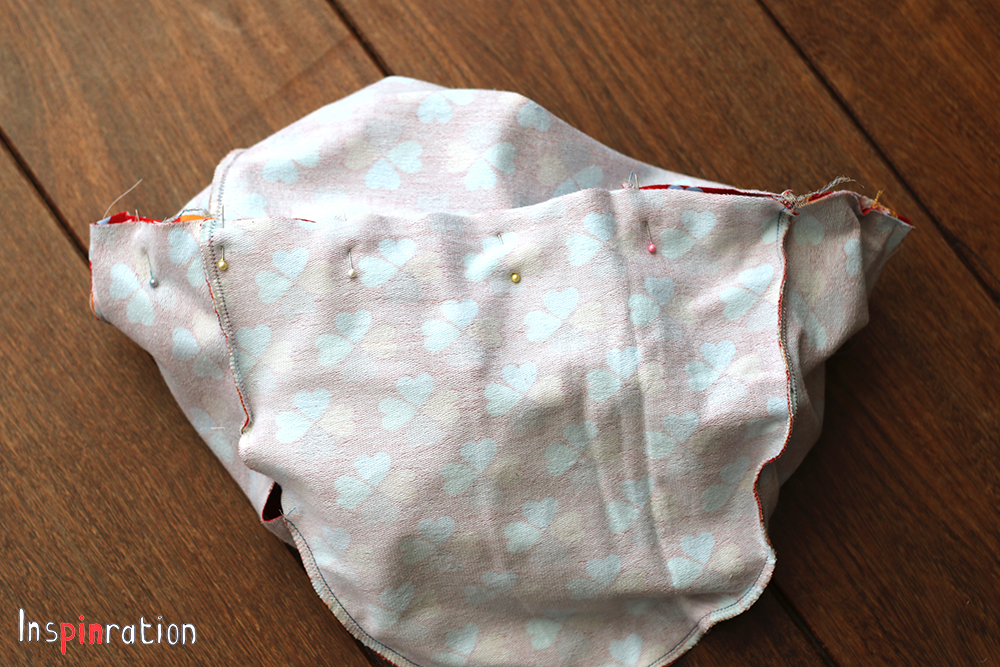
Now, without stretching, pin the next part of the neckline, continue until the end. You will end up with a strange, inside-out bag (like the photo below). The hood is totally covering the entire dress. Make sure that in the other end, the right side of the zipper is also totally against the already sewn seam. Reposition some pins in the middle with a bit of stretching, to make sure the end is nicely sandwiched as well. Now take you sewing machine and sew over the pinned line. In use my sewing machine for this step, and not my serger due to the zipper. On the beginning and end, you will have to sew over some zipper teeth, so go slow. Your sewing machine can do this, you serger might not be liking this step a lot. I used a stretch stitch for this step.
Vouw nu voorzichtig, zonder te rekken de buiten- en voeringsstof op de halslijn van de jurk/jasje. Het klinkt nu misschien lastig, maar als je het doet is het heel logisch nadat je de eerste speld erin hebt zitten. Speld zo de hele neklijn vast. Zorg dat aan de rechterkant de rits weer helemaal tegen de reeds genaaide naad van de kap aanzit. Als je niet helemaal uitkomt, dan verplaats je een paar speldjes in het midden en rek je het daar iets. Je eindigt dan met een soort vreemde binnenstebuiten zak (zoals de foto hieronder). De jurk/vest zit helemaal in de kap gevouwen. Naai vervolgens met je naaimachine over de vastgespelde neklijn. Ik naai over het algemeen het liefste met mijn lock, maar doe deze stap toch maar op de naaimachine. Je naait aan het begin en eind over een rits en daar wordt je lockmachine niet blij van. Ik gebruikte een stretchsteek bij deze stap.
Now just turn the whole thing through your turning hole. This is the moment to check if your zipper closes accurately. It could be that on one side you actually have an extra teeth showing. This is easily fixed. Put your hand in the turning hole and pull the problematic zipper side out. Just sew one extra line, a bit lower this time, to enclose another teeth. Check again, and if everything is fine, just close the hole by hand.
Nu kan je het geheel voorzichtig door het keergat halen. Controleer of de rits netjes tot boven sluit. Soms wil er wel eens aan één kant een tandje over zijn. Trek dan die problematische ritskant weer door het keergat. Naai vervolgens op je eerste stiklijn nog een streepje onder de ritstand. Het vorige stiksel hoef je niet te verwijderen, gewoon nog een extra stiksel geven. Draai weer terug, als het nu helemaal goed zit kun je het keergat sluiten met de hand.

If there are any questions, feel free to ask for more clarification. I tend to explain as quick as I sew 😉
Als je vragen hebt, roep maar. Ik leg over het algemeen net zo snel uit als dat ik naai namelijk 🙂
-
 Foliis Vest en Jurk – Nederlands$8.68 excl. tax
 -
 Foliis Jacket and Dress -English$8.68 excl. tax
Shares
This site uses Akismet to reduce spam. Learn how your comment data is processed.
Buy more save more
(PDF patterns only)
- Spend €25* or more and save 10%.
Use code: SAVE10 - Spend €45* or more and save 20%.
Use code: SAVE20 - Spend €65* or more and save 30%.
Use code: SAVE30
(Sale items excluded)
* Excl. Taxes
Recent comments
- Anne on The Hibernis/Semper or Omni. what’s the difference?
- Anne on Tutorial: How to add a Tulle Skirt to the Regina
- Judy Blumert on Tutorial: How to add a Tulle Skirt to the Regina
- Heleen Dewitte on 25K Grand Giveaway!
- Nicole on 25K Grand Giveaway!
Archives
Thank you for visiting
Thank you for visiting our website. This website and all its content are copyright protected. Please ask permission before sharing any pictures or articles, especially when a child is shown in the image.





Leave a Reply