Today on our Blog Tour, we have Ronda from Winingwife. She will teach you how to sew French seams. French seams are a great way to get a clean and beautiful look on the inside of your garment. Please read, and try it yourself.
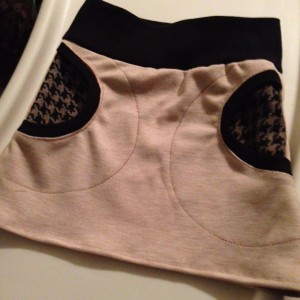
For this tutorial, Ronda used the Liv skirt. I would love to do a Giveaway on the Liv skirt, but it’s already free! Just follow the link in the listing, and you will find it 😉
 Hi! I’m Ronda Bowen from Wining Wife®. I’ve been sewing for over 20 years since I was a teenager. I sew for my whole family – my husband, our 17-year-old son, our 2-year-old daughter, and now our 6-week old son. I love pairing together fun fabrics with great patterns and putting something together that fits really nicely. I run a writing and editing business as well.
I’m here to talk with you about how to do French seams in your projects. For this, I chose the Liv Skirt that Sofilantjes offers. French Seams work best on lighter weight fabrics and sheer fabrics where you don’t want the seams to show, but they’re also really great for providing a nice finish and making a smoother seam for those who have sensory issues. I chose to use the skirt because it allows me to use fabrics with clear right and wrong sides for the instruction photographs, but I used this technique when I made the Otium in a sheer knit fabric. This technique would work great for lace and sheer overlays on the Iridis, Brueram, and Amare.
First, you divide your seam allowance in half. You will be sewing twice for each seam. For Sofilantjes’ patterns (who uses a 3/8″ – 1cm seam allowance), that means using a 3/16”, or ½ centimeter, seam allowance.
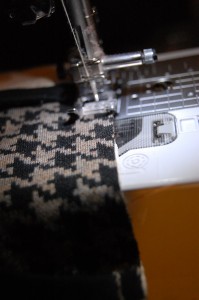
Once you’ve done that, you’re going to start with the pieces that need to be sewn together with the wrong sides together (like it will be when the garment is worn). You’re going to sew that seam with a 3/16″ or ½ centimeter allowance.
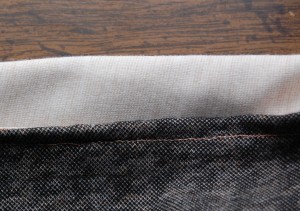
Carefully trim your seam close to the stitching.

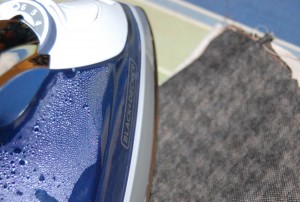
Press your seam open. Flip your fabric pieces so that they are now right sides together. Press again to get a crisp line.
Sew with right sides together and a 3/16″, or ½ cm seam allowance.
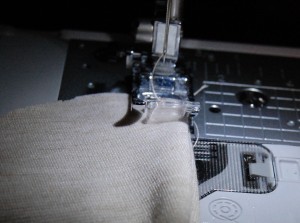
Press seam open and press seam allowance (now nicely bound) to the back of the garment. You’ll have something that looks like this:
Here’s the finished skirt on my model. I’m biased, but I think it’s super cute!
Using French seams is an easy technique to give your finished garments a more professional and clean appearance. What will you make using French Seams?
Thank you, Ronda, for writing this tutorial for us.
Only three more posts on this blog tour. I have learned so much already. You?
February 14: Handstitching the right way – Sprouting Jube Jube
March 7: How to alter a pattern – Deka Wear
Buy more save more
(PDF patterns only)
- Spend €25* or more and save 10%.
Use code: SAVE10 - Spend €45* or more and save 20%.
Use code: SAVE20 - Spend €65* or more and save 30%.
Use code: SAVE30
(Sale items excluded)
* Excl. Taxes
Recent comments
Archives

Thank you for visiting
Thank you for visiting our website. This website and all its content are copyright protected. Please ask permission before sharing any pictures or articles, especially when a child is shown in the image.


Leave a Reply