
Author: Anne

Learning Photography Week 3

Welcome back!!! We are now on Week 3 of our photography month!!! Hopefully, the past 2 weeks have been helpful and that you are taking the time to take some photos and learn more about your camera.

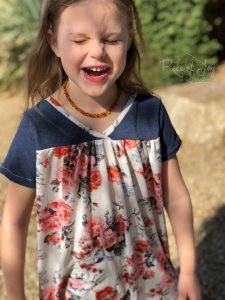
This week we are talking about posing people, especially kids, in photography, and some tricks to get kids to pose (not an easy feat!). While I am definitely not an expert, I do have three kids with various personalities, and have learned over the years some tricks to get some good photos especially for pattern testing!
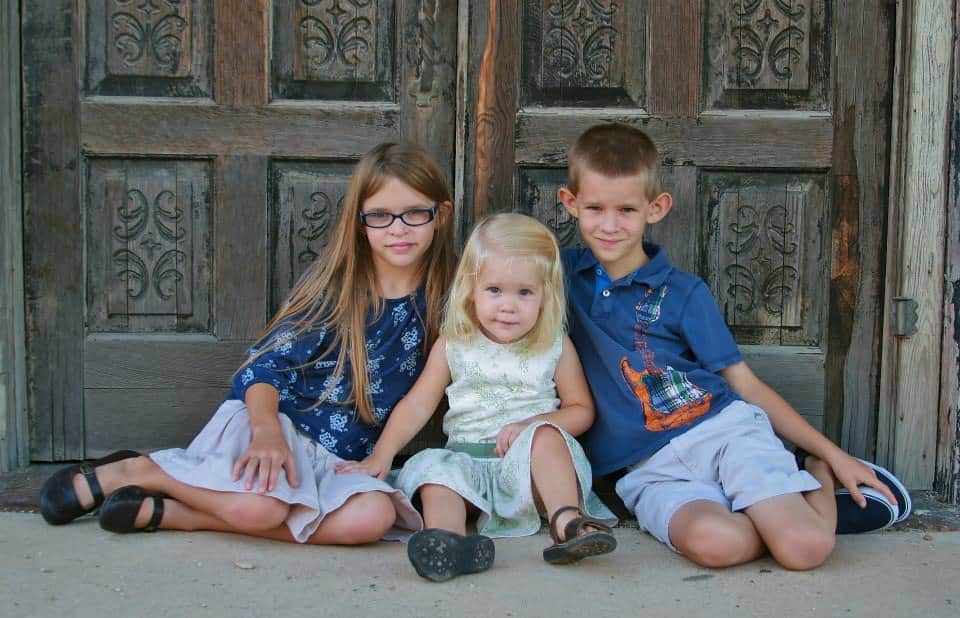
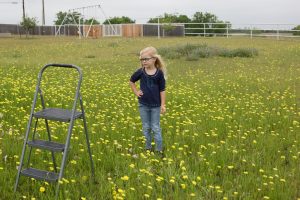
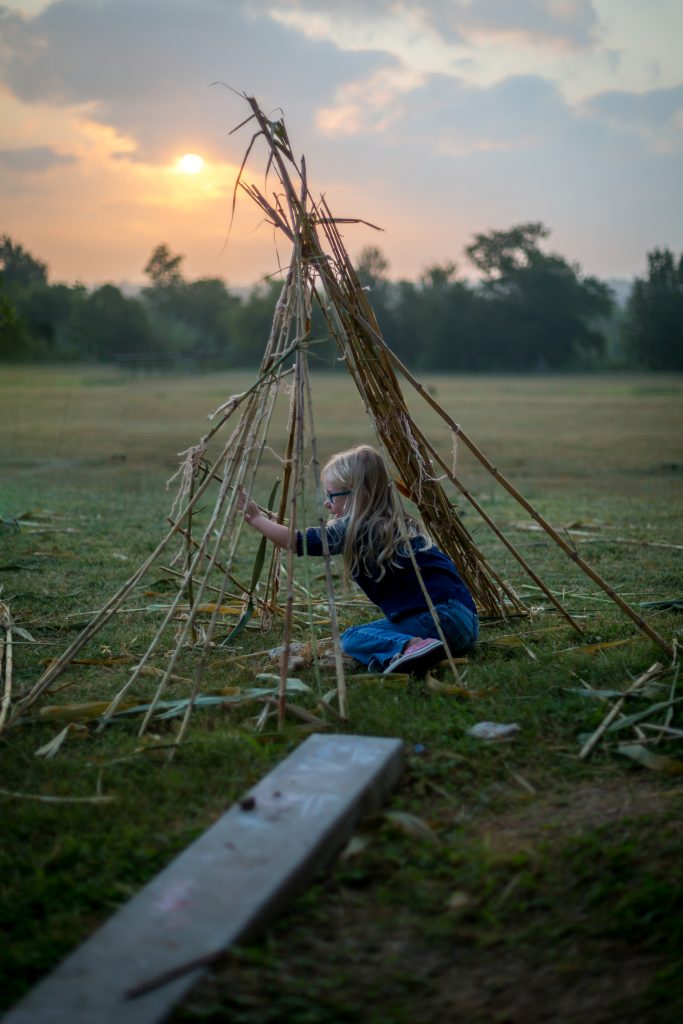
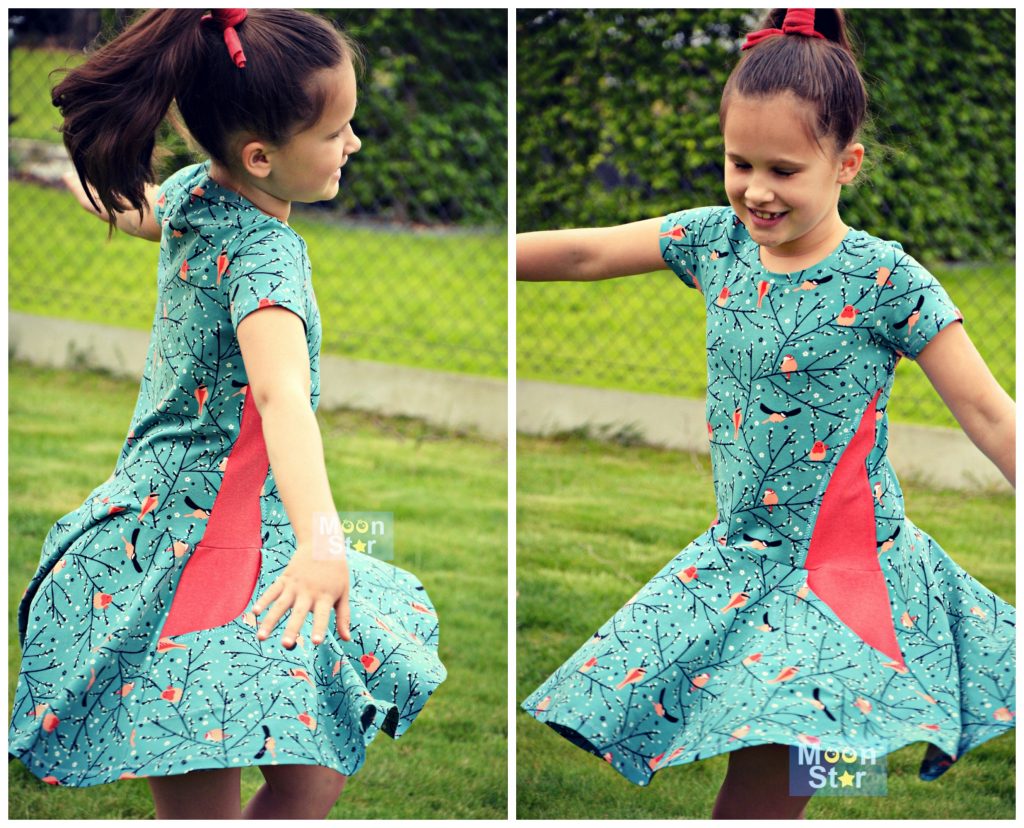
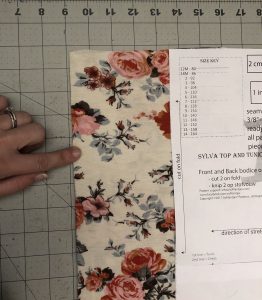
Let’s start with the kids first. I think the best tip to getting some good photos of children is being with them one on one. No other distractions. Take them to a new area, let them explore this new environment, ask them questions about what they see, all the while snapping photos. These photos seem to be the most natural. Some places that I have taken my kids are old abandoned buildings, a nature trail, field of wild flowers, a plant nursery, or even a post office. Depending on the time of day, I have found the lighting to be wonderful at these spots. Notice how I didn’t say your house or backyard, I leave this as my last resort. I find that these ‘familiar’ spots tend to be unexciting for the kids, and when I try to get them to look, smile, or pose, they just seem uninterested. Below are some photos that were taken by abandoned buildings that are in the old town we live near.

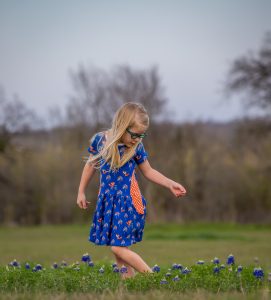
For pattern testing photos I found that the easiest way to get a natural photo is to have the child walk towards you or if you want to photograph the back of the outfit, have them walk away from you. The key is to tell them to walk slowly and just look straight ahead.

Another trick I found is to have them do something silly, tell a funny joke! Sometimes I will tell my daughter to check to see if there is anything on the bottom of her shoe.

Other times I will tell my daughter, she is 5, whatever you do PLEASE DO NOT SMILE, absolutely no smiling, and she can keep a straight face for all of two seconds, then I get a natural smile from her!

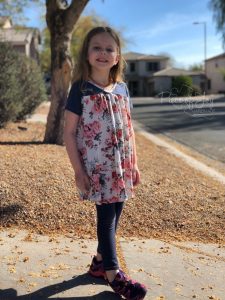
Other times I will tell my kids, that I am NOT taking a picture of their face, for a sneak peek on a pattern test or to show detail on the pattern. The kids tend to have a more relax stance when they know they don’t have to look or smile smile at me!

I find that kids, and well adults too, tend to not know what to do with their hands when taking photos. If you’re photographing an outfit that has pockets, I will have the child put one hand in the pocket while the other hand is left free. For boys I find that if they place their thumbs in their pockets that it leads to a more masculine stance. If no pockets, one hand on the hip works well.

I think the main thing to take away from photographing kids is that you really can’t POSE them, you can show them what you are looking for but depending on their age, they may not listen! The best thing you can do is to get down on their level and be interested in whatever they want to talk about! When I photograph my kids I’m typically squatting or on my knees, you want the camera to be at eye level with them! Occasionally, depending on the background behind them, I break the rule of being at eye level, and I will actually bring a step ladder.

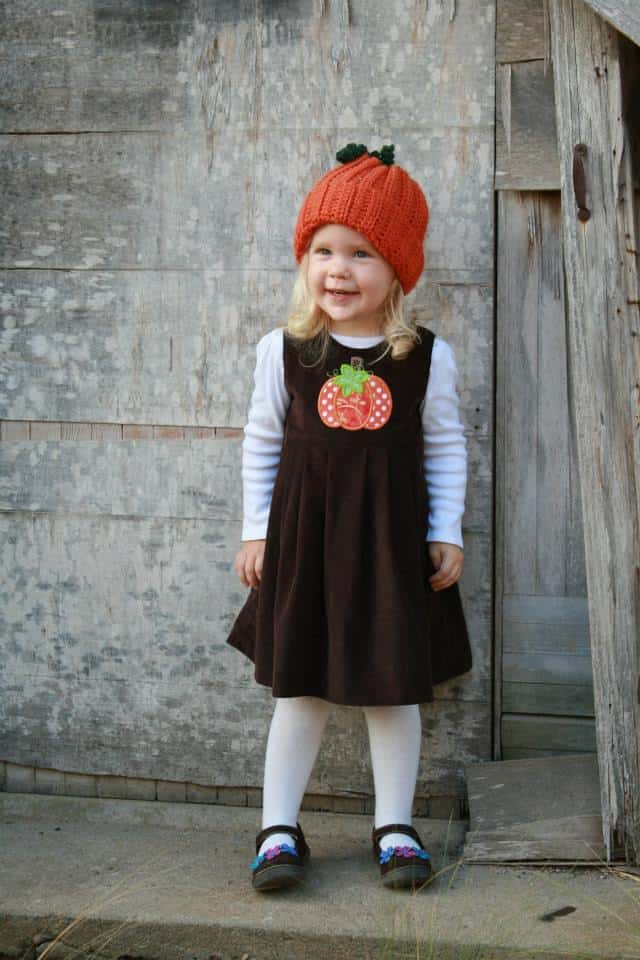
Another idea is to have them hold a prop. If you are photographing for a pattern test, make sure the prop isn’t distracting from the pattern but rather complements it. Some examples I have used in the past is a pair of sunglasses, a hat or even an umbrella.

And when all else fails…..bring candy!!!! Knowing that a lollipop is waiting for them after the photoshoot is completed, typically gets the kids attention. After many years of photographing my kids, they have learned, if they listen to what I am asking, I will only take a few photos and we can leave and go have fun.

Okay, while all the above works for ALL people, the older the child is, the easier child, they can follow directions. Just like last week, there are some basic ‘rules’ that most photographers will follow for posing subjects that are more mature. If most of these rules are followed the ending will result in a pleasing portrait.

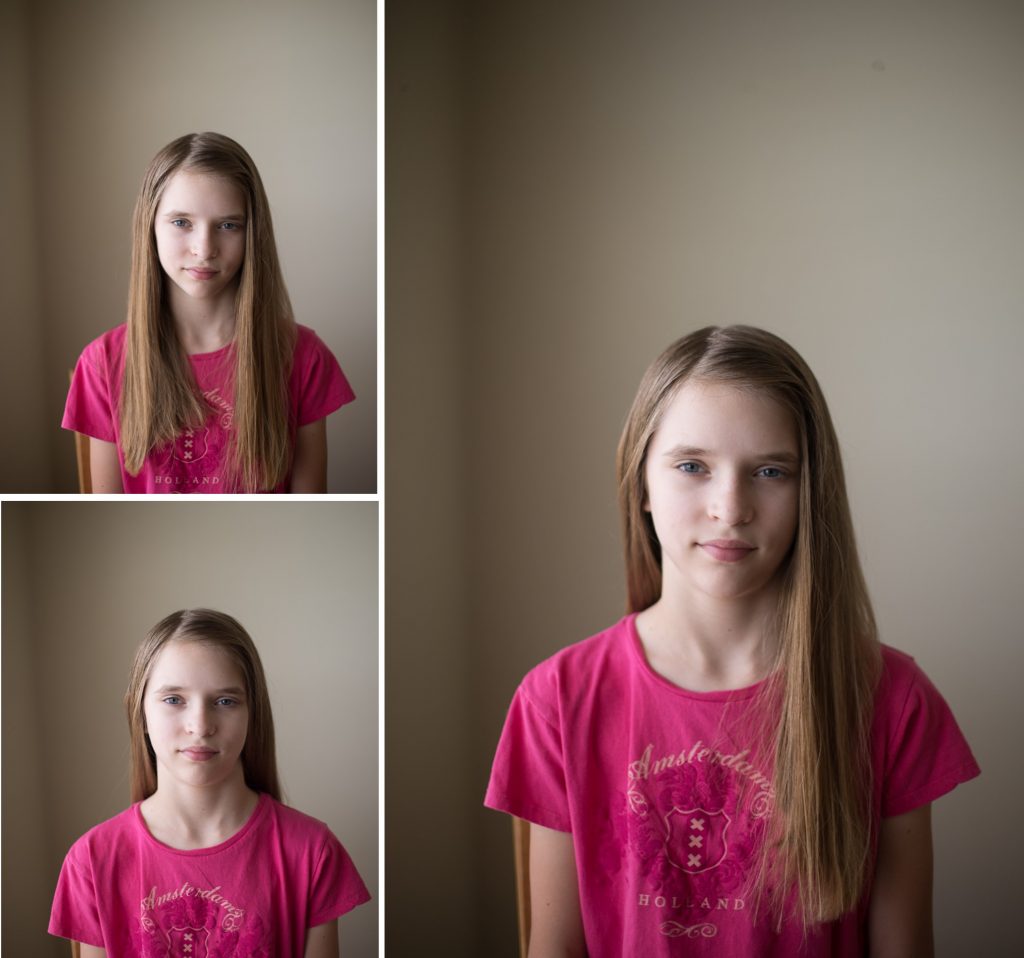
First rule – If your subject has long hair, it’s best to have their hair over one shoulder but behind the other. If the hair is over both shoulders, it tends to look a little messy. Another option is to have the hair pulled back.

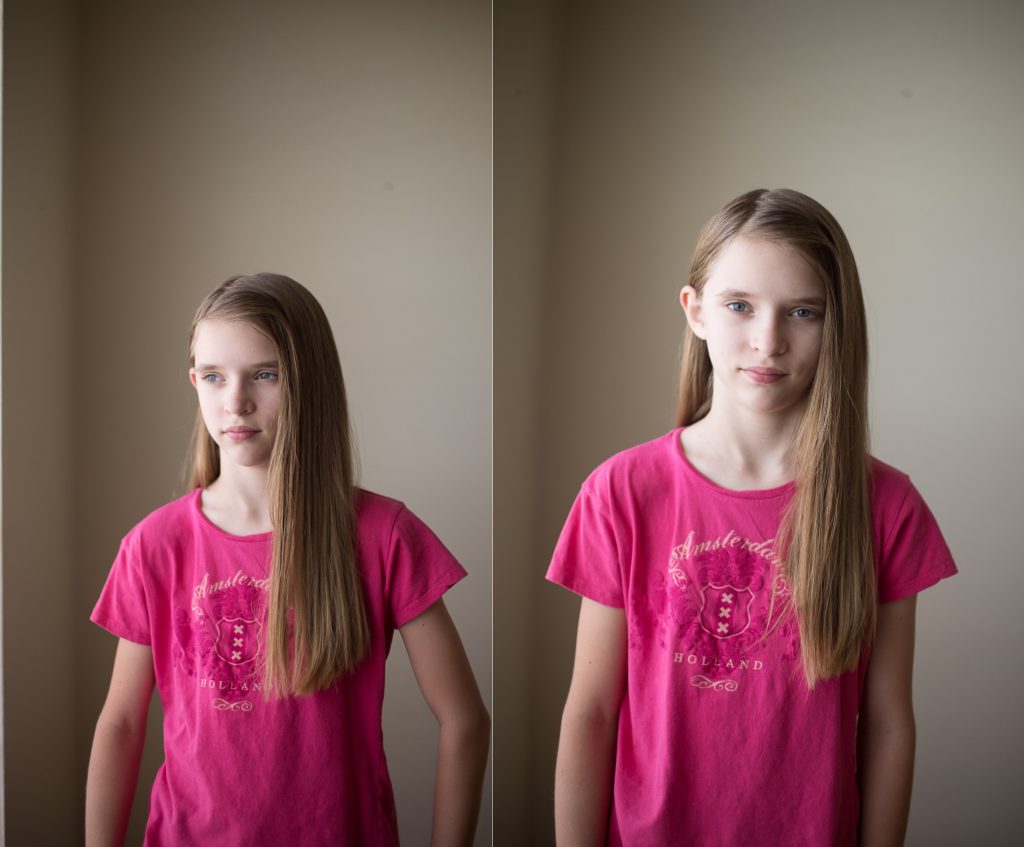
Second rule – When people stand naturally they tend to stand with their arms flat at their sides. This causes several problems. First, it makes them look awkward and uncomfortable in the photo. Secondly, their arm presses against their torso. This squishes the arm out and makes it look larger than it actually is. You can correct that by having them just lift their arm an inch or two so it is “floating” and not pressed against them. Alternatively, you can pose their hand so the arm is in a different position, such as putting their hand on the hip.

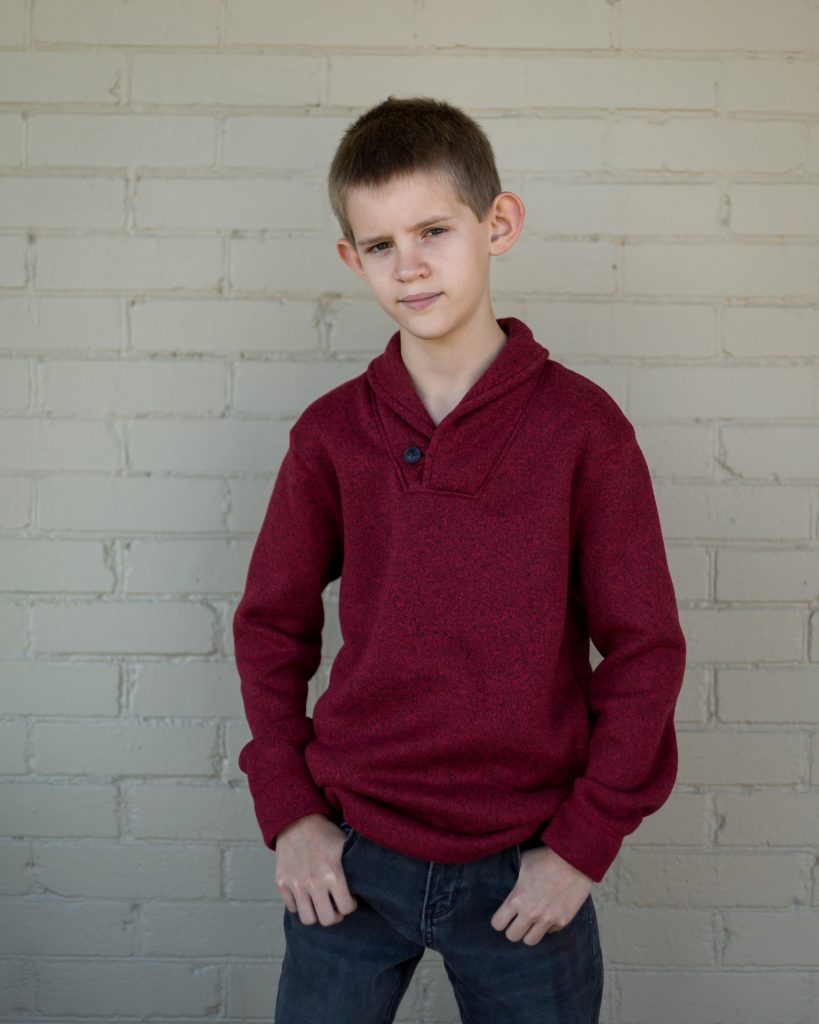
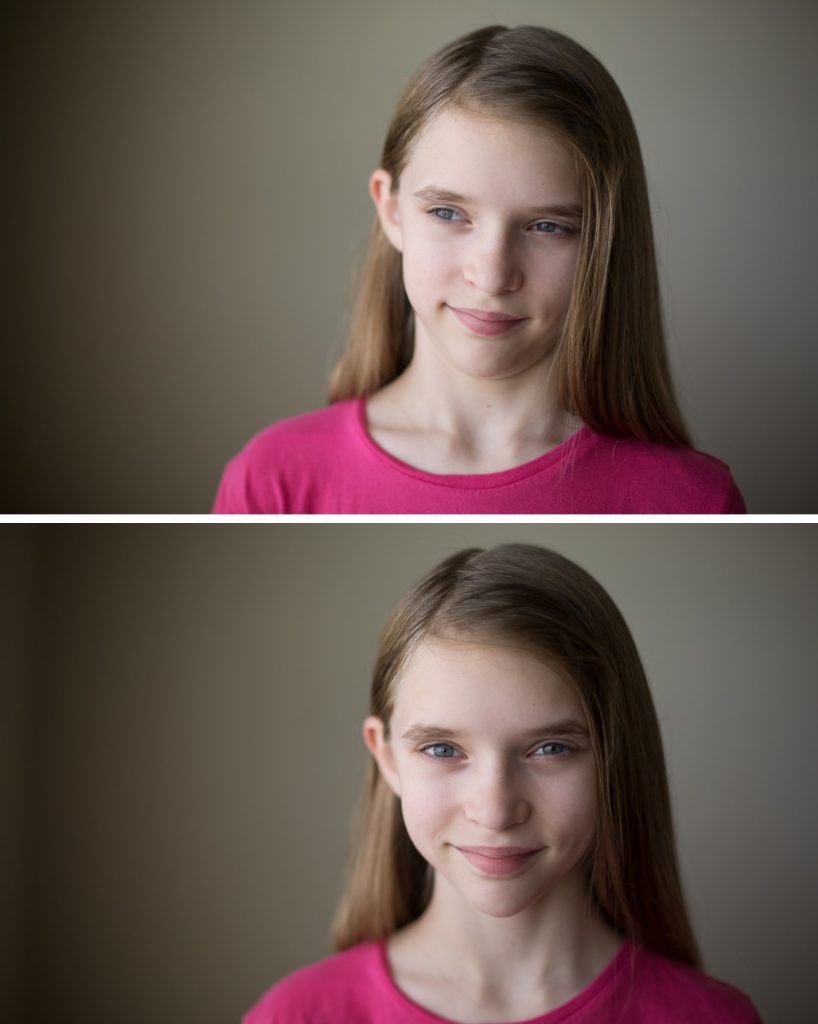
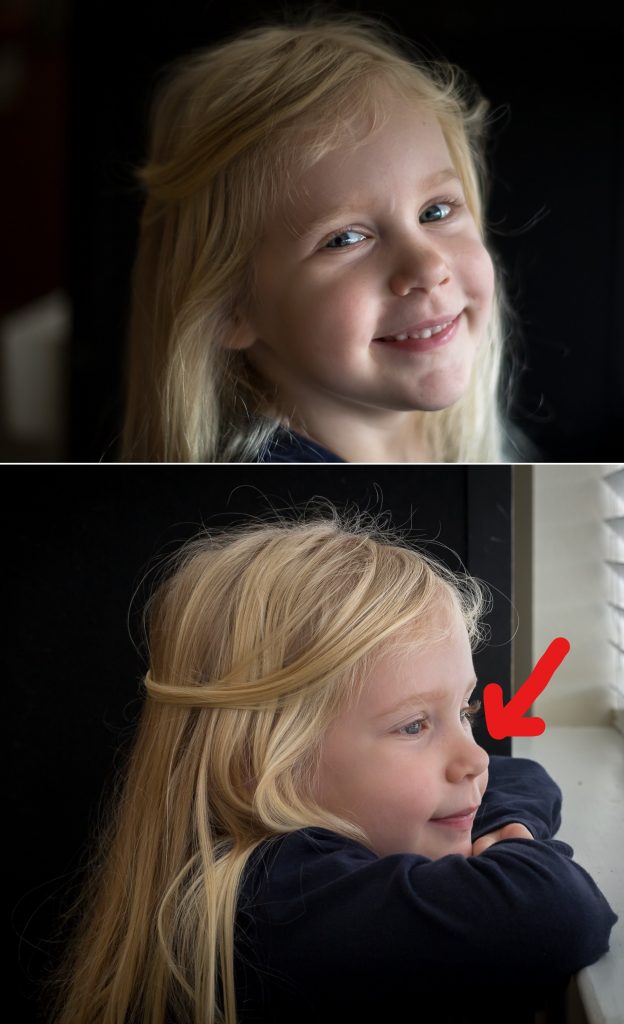
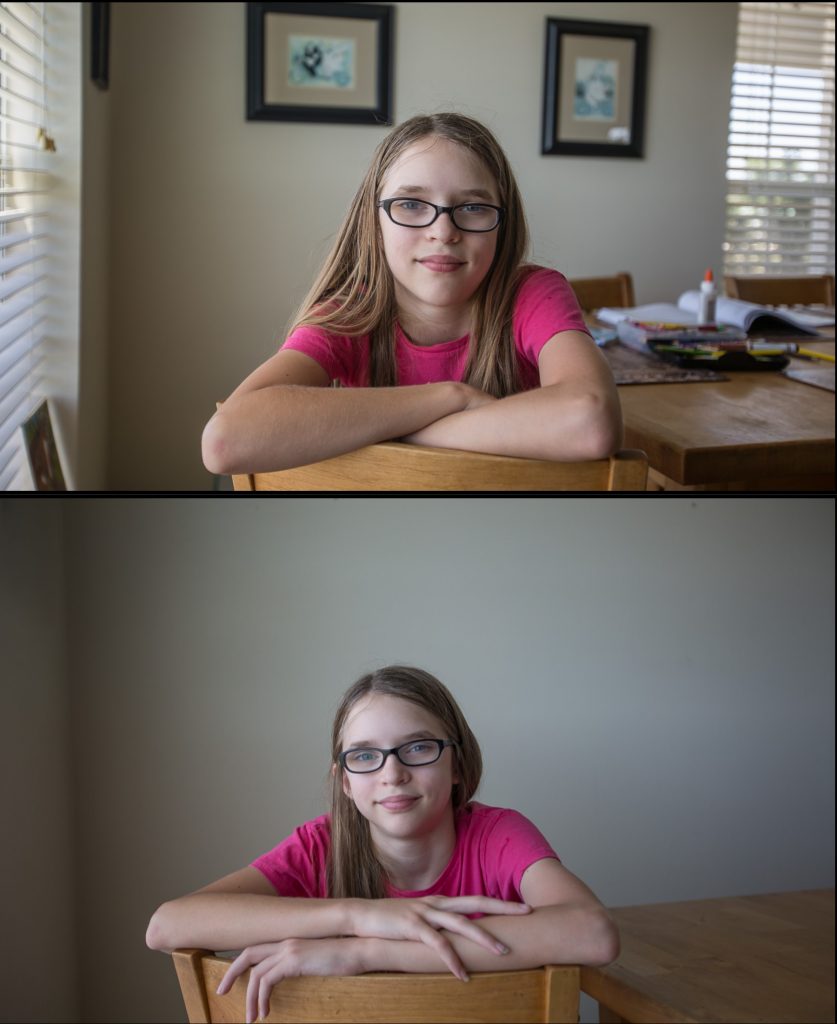
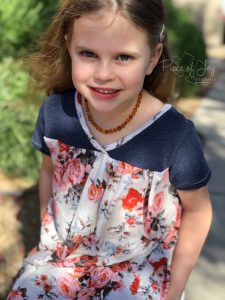
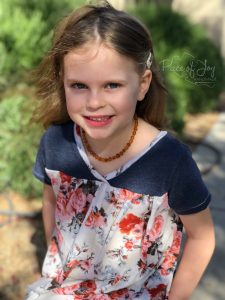
Third rule – When someone stands in their normal relaxed stance or even stands up straight to have nice posture, there is a little bit of flab right underneath their chin. No matter how skinny they are, you will see this. If you tell people to bring their chin forward, which sounds like the sensible thing to do, they will point their chin at you, which brings their face up and ends with you shooting up their nostrils. (Not attractive.) Instead, tell your model to bring their ears forward. This works well with men and women, boys and girls! Below the first picture is my daughter just standing normal, you can see the wrinkling around her jaw line. The second photo I told her to point the top of her ears towards me, I like this photo much more!

Fourth rule – Turning the shoulders is a very simple tip, but important. If your subject stares at the camera head-on, they look bigger. This can be good when shooting a football player, but it is bad when shooting beauty or portraits. By having your subject turn, they are showing a slimmer profile of themselves to the camera, and look slimmer.

Fifth rule – You don’t want to show the white of the eyes. Often times when I take photos for pattern tests, I will tell my kids to NOT look at the camera but I do not tell them to “look over there.” Instead I give them an object behind me to focus on so you can control their eye line.

Sixth rule – The last and final rule I will talk about here is a little more complex but just as important. You don’t want the nose to break the face. What I mean by this is, when you don’t want your subject facing forward; you have them turn to the side. Assuming you don’t want a full profile where you only see one side of the face, they will be at a quarter turn with both eyes in frame. If you draw an imaginary line down the side of their face, this line is the line that cannot be crossed by their nose. If they turn too far and the nose crosses this line, it “breaks” the natural curve of the face. It creates the “Pinocchio” effect and extends the length of their nose. You can avoid this by having them turn back toward you slightly, until you can see a little bit of space between the end of their nose, and the side of their face. You don’t want to break that line or it makes them look like they have disproportionate facial features.

So this week I want you to go out and try some of these techniques! Do they work for you? Are they helpful? Did you have fun? I want you to post some of your pictures you take trying some of these methods, whether you want to try photographing a portrait of an older child using the rules above or to go out with a younger child and go explore someplace new. Remember to post your photos in the picture folder called Photography Week 3, and I will go through the photos and offer constructive criticism. Most of all, remember to have fun! See you next week, which will be our final week, and we will talk about editing our photos!!!

Regem Color Block Extra Instructions

The Regem is the perfect shirt for scraps or to use during upcycling, but of course it gives great results with new fabrics as well. It is a quick and simple sew which gives a sophisticated result. In the Facebook group, we saw a few people that were a bit thrown off guard by the seam allowances for the color block. The seam allowances stick out and create some strange looking bumps. Today, we are showing how to sew the color block in extra detail. This pattern is perfectly suitable for beginners, so if you have some trouble, just look at these pictures and it should all become clear.

In the graphic, you can see the pattern pieces that you will need for the color blocked shirt. You can also see that if you would put the piece together such that they touch, the fabrics would not be a perfect fit. This is normal, the fabrics are only a perfect fit when you put the red lines on each other, that is the actual line that you will be sewing.

Continue reading

Learning Photography Week 2

I hope that this past week you had a chance to play around with various settings on your camera that we talked about previously. If you have any questions, feel free to tag me in the Facebook Sew and Show group, and I will do my best to help answer any questions you have.

So now we are into Week 2 of our photography month. This week I thought it would be best to talk a little bit about some rules of composition when you take a photo. I also thought we should learn a little bit about lighting and various backgrounds. Before we start, I should mention that all that we are talking about today includes digital cameras and phone cameras.

First though, let’s talk about composition! The first rule of composition is the rule of thirds! This one I almost ALWAYS follow (although rules are meant to be broken, I rarely break this one.)! On the inside of my view finder (or on the screen on the back) on my camera I have a grid made of lines. If your camera doesn’t have the grid lines you can imagine your screen in nine even blocks (3×3). Knowing where these lines are makes it easy to line up your most important elements either on the lines or at a point where the lines intercept. This method works great on landscapes and with portraits for people.

Leading lines is another popular photography technique. Our eyes are unconsciously drawn along lines in an image. You can position various objects along the line or have your main focus be at the end of your line that your eye will settle on, like the corn field picture I took here.

Creating Depth in your photos is a popular technique with landscapes. Having fore-, middle- and background detail will add depth to your image as well as draw the eye through the picture. Compositional elements that complement each other, for example with color, work well but do be careful with the size of objects you use and how you place them as you don’t want the shot to be thrown off balance.

The next technique is to fill the frame. If your subject is in danger of being lost because of a busy background, it may be best to crop or shoot the photo where your subject fills up most of the photo.

Watch the background, this step is so important. Sometimes we are so focused on getting our children to sit still, or pose, or look at the camera, that we forget what is BEHIND our subjects. Unsightly objects, overexposed or particularly bright areas and blocks/dots of bright color will all pull the eye from what it’s meant to be focusing on, so take a good look at your background before you take your shot and if possible, find a background that’s not so obtrusive. If you’re working on portraits make sure there’s no unwanted items sticking out of your subject’s head and unless it adds to the shot, throw the background out of focus. To do this, select a wider aperture (a lower f/stop) if working with a digital camera or select the Portrait Mode on a compact camera or cellphone to tell it you want to work with a wider aperture. If you need to shoot indoors, make sure that objects behind the subject aren’t too busy. I’m a mom, who homeschools all three kids, so we have laundry, books, papers all over the tables! I will simply push all the ‘clutter’ out of the way, pose my child, take the photo, then push all the stuff back! HAHA You can see in the picture below, I angled my camera so that I didn’t have any of the windows in my shot, I also took the pictures off the wall and moved all the papers and clutter off to the side, out of view.

The first photo below I was focused on lighting and camera settings and getting my daughter to look, that I failed to see the telephone pole directly behind her head, this is BAD!

The next photo I rotated her body 180 degrees, and had her step off our front porch, and, as you can see, the background is much more pleasing. (Please excuse the extremely windy day we had while I tried to take these example photos.)

ARTIFICIAL VS. NATURAL LIGHT

Natural light refers to sunlight/daylight, while artificial light refers to all kinds of light sources, including fluorescent lights, electric lights, flash, and so on. I will discuss the differences between these types of light sources below, but I will let you know that I almost exclusively shoot in natural light. It is so important to note, that if you shoot primarily with a cellphone, that natural light outside will produce the best photo. The suggestions for time of day and weather also apply to cellphone pictures.

Natural light

Natural light is less controllable, and it varies greatly depending on numerous conditions such as time of day, season, weather, and geographical location. To its credit, it does not require any equipment other than anything that you may choose to use as a diffuser, reflector, etc. The choice between using natural or artificial light is obviously more relevant for portrait or still life photography than it is for landscape or wildlife photography, where your choice is limited to natural light. The photo below was taken on a cloudy morning at sunrise.

These are some factors that affect natural light:

  • Weather For example, a cloudy day generates soft light and is usually preferred in photography. I get excited about cloudy days, because I just love the soft diffused light you get (and the non-squinting eyes from the kids!). By contrast, sunny lighting conditions yield harder, brighter light with shadows that are more defined. However, this just scratches the surface. Cloud cover is almost never even, and this leads to varying patterns and intensity in light. Various weather conditions, such as storms and fog, also alter the intensity and color of light. This can create shots that vary from being totally unusable to exceptional images with spectacular effects.
  • Time of day You can usually get softer lighting conditions early or late in the day. This light is generally warmer, producing images with less contrast compared to when the sun is high up in the sky. Sunrise and sunset are often considered ideal times for photography, particularly for landscapes and portraits. This time of day is referred to as the golden hour. If you do a quick google search you can find a calculator that will determine exactly how long and when your golden hour times are in relation to where you live. I always check the golden hour website before planning a shot because during this time of day, the lighting conditions change rapidly, both in terms of intensity and color, and allow for shooting images that are far more varied, often within the space of minutes. Shadows also change in shape and darkness, as the sun sets or rises, becoming longer and lighter as the sun sets and vice versa. Both of the pictures taken below were shot during the ‘golden hour’ although the first one was taken at sunrise and the second one was right before sunset.

Artificial Light

The challenges of using natural light are quite similar to those faced when shooting in artificial light. You must still understand how various light sources act upon a subject and how to produce the desired effect. Different sources of light can produce soft or hard light when shooting in a studio, but in this case, the photographer has direct control over elements such as hardness, distance, intensity, and angle. Furthermore, artificial light from different sources yields different color heat signatures. For instance, halogen bulbs are colder and produce a light that is blue in color, while tungsten bulbs, being hotter, produce light with a reddish hue. I have a few speedlights that can either attach to my camera or I can put on a stand with an umbrella or a diffuser. One trick with speedlights to help diffuse the strong flash is to place a white plastic grocery bag over the flash. Another trick is to point the flash up at the ceiling in your house to bounce the flash. This results in a softer lighting. I found that the key to artificial lighting is to practice. You need to find a willing subject to sit still or you can use a still object like a piece of fruit or a stuffed animal. The photo before was taken with an off camera flash (OCF) and the light of candle, also used Lightroom to edit this photo a bit, which I will go into during week 4.

When it comes down to controlling and manipulating light, there are many options within photography, whether you’re dealing with artificial, natural, soft, or hard light. It comes down to understanding how images are affected by different lighting conditions, setting up the desired lighting environment, adjusting your camera settings, and post-processing your picture in programs such as Gimp (a free program to download), Lightroom, or Photoshop.

So that is what we all need to work on this week. Get your camera out, shoot some pictures with various backgrounds, and in different lights using different rules from photography. Post your photos in the Sofilantjes Sew and Show Group in the folder Photography Week 2, I will try my best to go and give constructive criticism and feedback. Hope to see you next week where we will be talking about Posing and some tricks to taking photos of kids!

Learning Photography Week 1

I am excited to spend this month with you all and hopefully together we can all learn more about photography and how our cameras work to get the best photos possible with the equipment that you currently have. I should state that I am NOT a professional photographer, just a mom, who pattern tests, and loves photography, and is continuously learning more and more about photography through fellow photographers.

Since this is Week 1, I figured that best place to start would be to understand your camera and all the various settings you can choose from. Now, I am fully aware that not everyone will have a fancy digital camera or multiple lenses, and that the only camera you may have is your cellphone. Well the good news is you can still get a great photo with your cellphone! If you have a newer model phone, you will have the option to take photos in “portrait mode”. When you use this mode your camera uses a wider aperture, some phones go down to an f/stop of 1.8 even! With a wider aperture you will be able to make a background that is more blurred. See the photos below, the first one is just in regular photo mode on an iPhone, while the second photo is taken using the ‘portrait mode’, notice the difference with the backgrounds!!! The key to getting a good photo with a phone is to have great lighting and use portrait mode. Most photos taken with a phone will need to be taken outside or right by a window to get adequate lighting.

This next section, we will be talking to people who own DSLR’s or digital cameras.

Are you one of those people who bought an expensive (sometimes $1,000’s of dollars) on a nice camera but shoot in A, or Automatic mode?! It can be intimidating with so many options to choose from when shooting one picture. I hope through the course of this week, that I can convince you to try and play around with some different settings. (You will need to refer to your owner’s manual for your specific camera since all cameras are slightly different.)

Let’s start with some basic vocabulary. I feel like learning how to USE my camera, I had to learn a new language! Below are the three pillars of photography:

ISO – In very basic terms, ISO is simply a camera setting that will brighten or darken a photo. As you increase your ISO number, your photos will grow progressively brighter. For that reason, ISO is a good tool to help you capture images in dark environments or be more flexible about your aperture and shutter speed settings.

However, raising your ISO has consequences. A photo taken at too high of an ISO will show a lot of grain, also known as noise, and might not be usable. So, brightening a photo via ISO is always a trade-off. You should only raise your ISO when you are unable to brighten the photo via shutter speed or aperture instead (for example, if using a longer shutter speed would cause your subject to be blurry).

Shutter speed- Shutter speed is the length of time your camera shutter is open, exposing light onto the camera sensor. Essentially, it’s how long your camera spends taking a photo. A long shutter speed, will create movement in your photo (insert water, and stars photo). On the flip side a short shutter speed will do just the opposite – it will freeze a motion (insert water drop pictures) Shutter speeds are typically measured in fractions of a second, when they are under a second. For example 1/4 means a quarter of a second, while 1/250 means one two-hundred-and-fiftieth of a second (or four milliseconds).

Most modern digital and mirrorless cameras can handle shutter speeds of up to 1/4000th of a second, while some can handle much quicker speeds of 1/8000th of a second and faster. On the other hand, the longest available shutter speed on most digital or mirrorless cameras is typically 30 seconds. You can use a longer shutter speed by using external remote triggers, if necessary.

Aperture – is referred to as the opening of a lens’s diaphragm through which light passes. It is calibrated in f/stops and is generally written as numbers such as 1.4, 2, 2.8, 4, 5.6, 8, 11 and 16. The lower f/stops give more exposure because they represent the larger apertures, while the higher f/stops give less exposure because they represent smaller apertures. This may seem a little contradictory at first but will become clearer as you take pictures at varying f/stops.

Now that we understand a little bit of terminology, let’s look at the dial on the top of your camera, you will see things like P mode, Tv mode, Av mode, M mode, and with some camera B mode and Custom modes. In this lesson we will only talk about P, Tv, Av, and Manual Modes.
Let’s dive into what each of these presets is for and when to use them.

P Mode, is also known as Program Mode, and is a good choice for those who are just weaning themselves off of Automatic (A) Mode. In this mode, the camera determines the shutter speed and aperture, and lets you determine the ISO. Remember you want to keep your ISO as low as you can, depending on the light situation to avoid graininess in your pictures. Turn the mode dial to Program and lightly tap the shutter release button. You’ll see a combination of aperture and shutter speed appear. Move the camera around and you’ll see either the aperture, shutter speed or both change. Now let’s shift the settings. To activate Program Shift, rotate the camera’s control dial in one direction to select a wider aperture/faster shutter speed or in the opposite direction for a smaller aperture/slower shutter speed. This process can vary between models. If a combination of aperture and shutter speed is unavailable, try changing the ISO setting on the camera. Increasing it will make the sensor more sensitive to light, while choosing a lower setting decreases the sensor’s sensitivity.

First one is shot at ISO100 (because I was shooting into the bright light outside) and the camera told me that for this scenario that the aperture would be best at 6.3 and the shutter speed to be 1/200.

I didn’t love how much of the house I saw across the street so I overrode the Program setting by rotating my camera’s control wheel so that my aperture was set at 1.4 and my camera told me that we would need a shutter speed of 1/4000. I took the picture again and the background is much more blurred with still good lighting.

Tv Mode, is also known as Shutter Priority Mode. Shutter priority can be selected by turning the dial to S or TV depending on your camera. Shutter priority mode allows you to select the shutter speed and then the camera adjusts the aperture to a value that will work with the shutter speed you’ve selected to create a properly exposed photograph.

Shutter Speed controls how quickly or slowly your shutter closes. This allows you to control that amount of light that goes into the lens. The longer the shutter is open the more time the light has to get into the camera and hit the sensor to create the image. It also controls how much movement is visible in your photo. As the shutter speed increases movement is frozen, whereas decreasing the shutter speed increases the visibility of motion. If freezing movement, such as a twirling skirt, is your main focus, shutter priority is a good place to start.

This first photo was taken with a very fast shutter speed, 1/5000, with the intentions that I wanted to “freeze” the water droplets. Since in Tv Mode, you can choose what Shutter Speed you want, the camera will adjust your aperture accordingly. You do have the ability to adjust the ISO depending on how much light is available. For this frozen water picture, my ISO was 2500 (camera picked this for me), and my aperture was f/3.2 (camera picked this for me).

For the second photo I wanted to have the water appear more fluid so I used a much longer shutter speed, causing the water to be blurred. The only downfall to this, is that ANYTHING moving in your photo will appear blurry if there is any movement at all. The details on this photo is ISO 100 (camera picked this for me), aperture f/32 (camera picked this for me) and the shutter speed was 0.5 seconds.

Av Mode, is also known as Aperture Priority Mode. Turn the mode dial on top of the digital camera to select Aperture Priority mode, we can tell the camera how big or small we want the aperture opening to be. On most digital and Mirrorless cameras, there is a command dial that can be turned in two directions. By turning one way, you open up the aperture, and by turning in the opposite direction you narrow the aperture. If you look at the LCD screen, you will notice a number that changes as you alter the command dial. Wide apertures are represented by smaller numbers, and narrow apertures are represented by bigger numbers. Now that we understand where the aperture is, what it does, and how to modify it on a DSLR, why do we actually use it and why is it one of the most common semi-automatic shooting modes?

The main reason for using Aperture Priority is because it allows us to control Depth of Field (DOF).

In very simple terms, DOF is the area of a photo that appears acceptably sharp and in focus. To have as much in focus as possible, we normally use a narrow aperture (a larger number) – as in a landscape. To produce areas that are blurry or out of focus in front of and behind the main subject, we normally use a wider aperture (a smaller number) – as in a portrait of a person where the background is blurry.

The photo was taken in Aperture Priority mode with the Aperture set to the widest at f1.4. It resulted in a very shallow Depth of Field where the person in the foreground only in focus but everything in the background is blurry (out of focus). This was shot on my 50mm 1.4 lens, which is a common lens and affordable as far as lenses go 🙂 The camera settings ISO 100 (I chose this since it was a bright sunny day), f/1.4, shutter speed 1/2000 (camera chose this for me).

This photo of a sunset was taken in Aperture Priority mode as well but in order to maximize the Depth of Field, I set Aperture to f11. Everything, from the grass in the foreground to the trees in the background, is in focus. Camera settings ISO 1600 (picked by the camera), aperture f/11, shutter speed 1/8 (picked by the camera, I need to set the camera on a rock to avoid movement at a shutter speed this low)

Lastly, we have Manual Mode, most typically labelled M on the cameras dial. After you feel comfortable and understand how your camera works, you are ready to take full control of the outcome of your pictures. In Manual Mode you control the shutter speed, aperture and the ISO. These three settings work together to control the how bright or dark your photo is (known as exposure), as well as change the overall look of the image. Learning to shoot in Manual Mode will give you control over shooting in difficult lighting situations. An example of this would be if your subject is back lit. If the light behind your subject is much brighter than your subject itself, then your camera will try to adjust the settings in order to capture the brighter light. This will result in your subject being completely underexposed, and hard to see. Not good. Another example of when Manual Mode is necessary, is shooting the stars at night or any night landscape. The first thing to know is that it might take a little while before you get really comfortable shooting in manual mode, especially when you’re first learning photography. You have so much to think about, like composition, lighting, subject interaction, etc., that it can be tough to constantly keep your aperture, shutter speed and ISO in mind as well.

The big thing to keep in mind is that eventually, it will feel natural and intuitive! With enough practice, you will start to adjust your settings quickly and easily. So stick with it! Now here is where I want YOU to practice. Play around with settings on your camera, take pictures, take LOTS of pictures, post some pictures to the Sofilantjes Sew and Show group in the picture folder labeled Photography Week 1. I will go through all the photos posted there and offer help and suggestions, in the photography world it’s called Constructive Criticism, or CC. I feel that you can really grow in your photography skills by suggestions and guidance, I know that is how I learned, and that is how I continue to grow with my photography. I can’t wait to see all your photos!!!!! See you next week where we will be talking about Composition, Lighting and Backgrounds!

Guestblog: A Regular Hem to a Circle Skirt

In our Sofilantjes Sew & Show Facebook group we often see questions about hemming a circle skirt.
In this blogpost one of our Admins, Patricia from Wondermirakel – MoonStar, will explain some sewing techniques you can use for hemming a circle skirt.

Hemming a circle skirt can be done in several ways: bias binding, a rolled hem, a regular hem… Today I will explain how to do a regular hem with a very easy trick.
You might need to go search for your sewing machine/serger manual so you can look up how to adjust the (differential feed) tension. Other than that, it’s easy peasy.

I had this gorgeous fabric that was telling me it wanted to be a Foras Dress with a circle skirt. My 9-year-old needed new spring/summer dresses and this pattern suits her so well. The perfect moment to make a blogpost!

Een cirkelrok omzomen kan op verschillende manieren: biais bandje, een rolzoom, gewone zoom… Vandaag leg ik uit hoe je met een eenvoudig trucje een gewone zoom kan maken. Je kan best even je handleiding voor je naaimachine/overlockmachine erbij halen zodat je kan opzoeken hoe je de spanning of  differentieel moet aanpassen. Voor de rest is het een koud kunstje.

Ik had een stofje liggen dat me vertelde dat het een Foras jurk met cirkelrok wilde worden. Mijn 9-jarige dochter had nieuwe lente/zomer jurken nodig en dit patroon staat haar zo mooi. Het perfecte moment om een blogpost te maken!

Sew your dress following the instructions. Some will tell you, you need to hang the dress on a hanger for a while or even to wash and dry it first before you start hemming it. Alas, I’m too lazy and impatient for that, so I hem the dresses immediately.

Naai de jurk volgens de instructies. Sommigen zullen je vertellen dat je de jurk met cirkelrok eerst moet uithangen op een kaptstok of zelfs eerst moet wassen en drogen voor je de rok gaat omzomen. Helaas, ik ben te lui en te ongeduldig, dus ik stort me steeds meteen op het omzomen

First trick I want to share with you is the way I put markings on my fabric: I use kids markers that are washable. If you’re not sure if they’re washable, try it on some scrap fabric. I use kids markers from a certain Swedish store…
I mark the line to where I should fold my hem; that’s twice the hemming allowance of the skirt. And I mark it all the way around. Use whatever tool that’s easiest for you to put the marking.

Het eerste trucje dat ik met jullie wil delen is de manier waarop ik mijn markeringen op mijn stof zet: ik gebruik uitwasbare kinderstiften. Als je niet zeker bent dat ze uitwasbaar zijn, probeer het dan eerst even op een restje stof. Zelf gebruik ik kinderstiften van een zekere Zweedse winkelketen…
Ik markeer de lijn tot waar ik de zoom moet omplooien; dat is twee keer de zoomtoelage van de rok. En ik markeer die helemaal rondom. Gebruik het hulpmiddel dat voor jou het makkelijkst is om te meten en markeren.

Next step is to set the differential feed on your serger to a higher tension or your sewing machine to a high tension and sew with a zigzag stitch.
I have a Bernina serger and my manual tells me to set the differential to 2, as shown in the photo.
Now finish the raw edge with your serger (do not cut any fabric off with the serger blade) or your sewing machine set to a zig-zag stitch. The fabric will gather slightly and this is exactly what we want because it will make it easier to fold under in the next step.

De volgende stap is om de spanning van je differentieel transport te verhogen of de draadspanning van je naaimachine en dan met een zigzagsteek te naaien.
Ik heb een overlockmachine van Bernina en mijn handleiding vertelt me dat ik het differentieel transport op 2 moet zetten, zoals je op de foto kan zien.
Werk nu de onafgewerkte rand af met je overlock (zonder stof af te snijden) of met je naaimachine met een zigzagsteek. De stof zal lichtjes gerimpeld worden en d
at is nu exact wat we willen om in de volgende stap de zoom om te vouwen.

In this third step you will fold and press the finished edge. The markings you made in the first step will tell you exactly to where you need to fold the fabric. Because the fabric is curled to the inside a bit, it’s quite easy to fold and press it.

In deze derde stap ga je de zoom omvouwen en strijken. De markeringen die je in de eerste stap hebt gemaakt zullen je vertellen tot waar  je de zoom precies moet omvouwen. Omdat je stof nu lichtjes naar binnen krult is het redelijk makkelijk om te vouwen en strijken.

Now your skirt is ready for hemming, but I have another tip for you! To make sure the hem stays in place, pin the hem all the way around. The more experienced seamstress might not need this step, but if you are a bit of a perfectionist like me, pinning the hem will give you a much better result in the end.
After sewing it with a twin needle or a decorative stitch give the skirt another press and you’re ready to show your pretty twirling dress!

De rok is nu klaar om de zoom te naaien. Maar ik heb nog een kleine tip voor je! Om zeker te zijn dat de zoom netjes op z’n plaats blijft, speld helemaal rondom de zoom vast. De wat meer ervaren naaister zal deze stap misschien niet nodig hebben, maar als je een beetje perfectionistisch aangelegd bent zoals ik zal het spelden je een veel mooier resultaat geven wanneer je klaar bent.
Wanneer je klaar bent met naaien met een tweelingnaald of decoratieve steek strijk je de rok nog een keer. Nu ben je helemaal klaar om je mooie rok aan iedereen te laten zien! 
  

Gather the Sylva

Hey there! I don’t know about you, but I LOVE Sofilantjes Patterns. Sofilantjes (Anne Jacobs designer) has some AMAZING patterns and techniques which makes them so much fun.

I always find that the patterns allow people to become creative, without actually having to imagine up anything by themselves because Anne has already done all of the hard work!

I love being able to use patterns for multiple different looks, so sometimes I like to play a little with the pattern. The Sylva Top and Tunic is already a great pattern, with multiple necklines available.  There is a V-neck/V-back option, or a hooded option.  I love the V-neck/V-back option because my 4.5 year old can put it on forward or backward without me needing to turn it to the right side!

I wanted to use a Rayon Knit blend for this, but knew it didn’t have enough recovery to the fabric. Here comes the fun. I made the front and back bodice piece gathered, so the flowy rayon would work.

Here is the finished tunic:

Here is how to do this quick hack:

  1. Print out the pattern based on the measurements of your child. Make no changes to that.
  2. You can do a tunic or a shirt. The length will not be altered.
  3. Cut every piece out according to the directions, EXCEPT the front and back bodice piece (same pattern piece).
  4. When you get to that part, follow below

Fold the fabric and place the pattern piece in line with the fold (DON’T CUT)

Slide the pattern over about 4-6″

Cut the pattern out with the new space added on

Repeat for back piece.

Sew two basting rows (Long, straight, gathering stitches) on the top portion of the front piece.


Repeat for the back.

Pull the gathering rows, and gather the fabric to fit the top portion of the bodice.

Attach the gathered bodice portion to the shoulder portion, and sew as directed in the directions. Repeat for the back.


Continue with directions as normal, and be sure to remove any basting stitches that are visible.

And that is it!

\

Hope you found this helpful! Thanks for reading!

Tiffany Hering

Sew A Piece of Joy

ADVtee uit 1 paneel + Tutorial met alternatieve V-hals

Ik vind het best een uitdaging om leuke patronen te vinden voor mijn stoere boy, dus ik hoefde niet lang na te denken of ik dit patroon zou aanschaffen. De ADVtee van Sofilantjes is een heerlijk patroontje om te maken, voor jongens én meiden. Dit t-shirt heeft zo veel leuke mogelijkheden, met bijvoorbeeld colorblock en een borstzakje of de kraag met drukknoopjes. En met de lange/korte mouw optie is het een patroon dat je het hele jaar door kunt gebruiken. Leuk om te maken en om te dragen, de shirts die ik maakte naar dit patroon zijn mijn zoontjes favoriete shirts.

Al een aantal keer deelde ik mijn naaisels van de ADVtee uit 1 paneel. Ik vind het zonde om zo’n mooi paneel in stukken te knippen als ik het op exact dezelfde plaats weer aan elkaar naai. Omdat ik er veel vragen over kreeg hoe ik dat gedaan had, heb ik Anne gevraagd of ik er een tutorial over mocht maken. En ze ging akkoord (leuk)!!! Bij dit t-shirt heb ik een alternatieve wijze gebruikt om de V-hals te maken, dus die komt er als bonus bij. Laten we beginnen!

Benodigdheden:
ADVtee patroon van Sofilantjes, ik maakte maat 128 en dat is qua breedte wel het maximaal haalbare voor de afmetingen van dit paneel.
Paneel retro scooter, 83 x 83 cm (ik kreeg deze van Stoffenelf.nl, ja ik ben een bofkont)

Het gebruikelijke aan naaigerij: schaar, spelden, naaimachine en/of lockmachine.
Een leuke stof voor mouwen en boord. Ik gebruikte french terry in jeanslook, gekocht op het Stoffenspektakel.
Ik ga er voor het gemak in deze tutorial van uit dat je het patroon al hebt geprint en aan elkaar geplakt.

Werkwijze:

Stap 1: Neem het patroon over in de juiste maat. Let er hierbij op dat je het hele voorpand nodig hebt én het hele achterpand. We knippen deze niet op de vouw. (Ik knipte een extra half rugpand omdat ik er al 1 had)

Continue reading

Guestpost: Mantica – Litore

Guestpost by MoonStar-Wondermirakel

If you haven’t seen a Mantica Dress yet, you’ve probably been cut off from all social media for the past week.
Especially in the Sofilantjes Sew & Show group on Facebook about 150 Mantica dresses have been shown. The Buy-Sew-Show-Win contest with the hashtag ‘FreeMantica’ might have something to do with it.

Misschien zag u nog geen enkele Mantica Jurk, maar dan bent u wellicht afgesloten geweest van sociale media de afgelopen week.
Vooral in de Sofilantjes Sew & Show groep op Facebook werden er ongeveer 150 Mantica jurken gedeeld. Maar de Koop-Naai-Toon-Win actie met de hashtag ‘FreeMantica’ zal daar wel iets mee te maken gehad hebben.

Real beauties have passed my screen. It turns out I wasn’t the only one who tried a different skirt to fit the Mantica bodice. Some have sewn it, but several have asked questions about it.
During testing I hacked the pattern by attaching the Litore high-low skirt to the Mantica. It was instant love for me!
It is sooooooo easy that I don’t even need pictures to explain how to go about it.

Prachtige exemplaren kwamen er op mijn scherm voorbij. Het was ook snel duidelijke dat ik niet de enige was die met de gedachte speelde om een andere rok aan de Mantica te maken. Enkele lieten hun creatie zien, anderen hadden er vragen over.
Tijdens het testen “hackte” ik het patroon van de Mantica door er een hoog-laag rok van de Litore aan te maken. Het was liefde op het eerste gezicht voor mij!
Het fijne eraan is dat het echt zooooooooooooooooooo gemakkelijk is dat ik niet eens foto’s nodig heb om uit te leggen hoe je dit zelf kan doen.

What you should know:

  • the Litore & Solis have the same bodice fit and Mantica bodice has a different fit! The Litore & Solis Dress are designed to be a tight fit, they have a negative ease. The Mantica Dress has a regular ease.
  • the Litore/Solis have no waistband in opposite to the Mantica. This means the skirts have different lengths.

Wat je moet weten:

  • de Litore en Solis hebben eenzelfde pasvorm, maar de Mantica heeft een andere pasvorm qua lijfje! De Litore en Solis zijn ontworpen om erg strak te zitten. Het afgewerkte lijfje is kleiner dan de omtrek van je kind zodat het lijfje erg nauw aansluit. De Mantica jurk is een ‘gewoon’ aansluitend model.
  • de Litore/Solis hebben geen heupboord in tegenstelling tot de Mantica. Dit wil zeggen dat de rokken een andere lengte hebben.

Which steps to follow:

  • First step is to compare the bodices to see how much difference there is.
    I layed my Mantica pattern piece of the size I was making (size 9) on top of the Litore pattern to figure out what size I had to compare it with. I decided on size 10, so just one size up.
  • Next cut out the Litore/Solis skirt you want in the size that fits the length you need.
    I cut out the high low skirt of the Solis, in size 8 because that is the size she needs for length.
  • You now have to draw the right waist on the skirt.
    In my case the waist was 2 sizes too small, so I drew the waist of the Litore size 10 on my size 8 pattern piece
  • Last but not least: cut off 2 inches on the bottom of the skirt pattern piece you just made (unless you want a longer skirt)
    You need to do this because the bodice of the Mantica is about 2 inch longer then the Litore/Solis bodice due to the added waistband.
    I drew dots all the way along the curved lines every 1/2 inch thus creating a cutting line to shorten the skirt pattern piece.
  • Now you are ready to cut your fabric and sew the skirt as instructed.

It’s that simple!

How I love this pocket!

Te volgen stappen:

  • Eerste stap: vergelijk de lijfjes om te zien hoeveel verschil er tussen zit.
    Ik legde mijn Mantica patroondeel in de maat die ik ging maken (maat 134) op het patroon van de Litore om te zoeken welke maat ik als vergelijkingspunt moest gebruiken. Ik besliste dat maat 140 het beste paste, dus slecht 1 maat groter.
  • Vervolgens knipt u het rokpatroondeel van de Litore/Solis uit in de maat die past bij de lengte die u maakt.
    Ik knipte het patroondeel van de hoog-laag rok van de Litore uit in maat 128
  • Als volgende stap moet u de passende taille aan de rok tekenen.
    In mijn geval was de taille 2 maten te klein, dus nam ik de taille van maat 140 van de Litore over op mijn patroondeel van maat 128
  • Als laatste stap moet u het rokpatroondeel inkorten door 5cm onderaan weg te nemen (tenzij u een langere rok wil).
    De reden waarom u dit moet doen is dat het lijfje van de Mantica 5cm langer is dan de Litore/Solis door de heupboord.
    Ik tekende om de 1,5cm een streepje op 5 cm van de onderkant waardoor dit een kniplijn creëert om het patroondeel van de rok te kunnen inkorten.
    Nu kan u stof knippen en de rok verder maken zoals de instructies u uitleggen.

Now let me show you some photo’s of the result.
She wanted to show the beauty of a high-low circle skirt & of course the best feature of it: twirling!

Laat me u nu nog een paar foto’s tonen van het resultaat.
Zij wilde graag de pracht van de hoog-laag rok laten zien en uiteraard het beste stuk: zwieren!

I am not the twinning type, but this kind of twinning does melt my heart.
Ik ben niet zo’n fan om mijn kinderen hetzelfde aan te laten trekken, maar dit soort ‘twinning’ doet mijn hart toch smelten.

Foliis: How to sew the Zipper

Guestblog by MoonStarWonderMirakel


Last week the Foliis Jacket and Dress was released. Personally I’m totally in love with this pattern!
And I’m so eager to try Miranda’s tutorial on the hood and Amanda’s zipperless dress hack… But first I’m giving you another Foliis blogpost.

This one is for those who are in need of extra steps on how to sew a zipper and how to insert the zipper in the hood of the Foliis.
I used the dress version of the Foliis (view C) to make this tutorial.

zipper-tutorial


Continue reading

Guestpost: Foliis (no zipper) dress hack


The Sofilantjes’ Foliis pattern is amazing and wonderful and I love it!  It’s quick and easy and makes such a lovely little jacket.  I tested both the long jacket and the cropped jacket.  Read more about them here.


As I was testing the cropped version, I had somewhat of a styling crisis.  I could not figure out what I wanted to pair with this cute little cropped jacket.  I liked the look of the cropped jacket with the Gemini, but I also wanted to try another look.  A simple dress, maybe…  


I found a bit of grey fleece that matched the dark grey in the elephants and a bit of light grey ribbing that matched the light grey in the elephants.  I did a little experiment and came up with this.  A slightly modified version of Option C of the Foliis Dress.

It pairs perfectly with the jacket, and Buttercup gets her beloved pockets.


This is a really simple modification.  It only requires a little bit of extra ribbing for the neck. And no zippers or closures, this little thing slips right on over the head. 


Here’s how to make one of your very own:


1. Use the same pattern pieces as required for the Option C dress

  • Bodice front, cut on waistline
  • Bodice back, cut on waistline
  • Sleeve
  • Skirt front, with pockets cut out
  • Skirt back
  • Pocket piece
  • Pocket facing
  • Pocket ribbing
  • Extra ribbing for neckband  xx” (length) x 2″ (width)
2. Cut each piece as stated, EXCEPT the bodice front. Cut bodice front on fold.  Move center front edge of pattern piece past fold 3/8″ (1cm).  


3.  Place back bodice and front bodice right sides together. Sew shoulder seams. Press shoulder seams toward back.
 
 
4.  Pint the sleeve to the armhole, right sides together.  Find center point of sleeve and match to shoulder seam. Sew the sleeve to the armhole. Repeat with other sleeve.
 
 
5. Fold bodice front and back together along center lines.  Measure the length from center front to center back.
 
 
This next step will make it easier to attach the neckband equally, skip it if you wish.
6. Place pins and center front and center back.  Fold in half, matching center front and center back pins, place pin at each fold to mark quarters.


7. To find the length of your neckband it’s Math Time:  
  • Length from center front to center back x 2
  • total length x 80% (or .8)
  • Example from dress shown:  
      • 8.75in. x 2 =  17.5in.
      • 17.5in. x .8 = 14in  (total length of neckband)
8. Cut ribbing   xx” (total length of neckband) x 2in. (width).  Be sure length goes same direction as stretch.
 
 
9. Fold ribbing in half, right sides together, matching short ends. Sew side to create a loop
 
 
10. Fold ribbing in half, wrong sides together, matching raw edges. Press.  Mark quarters with pins.
 
 
11. Place the neckband on the right side of the fabric, align ribbing seam with center of back bodice, matching raw edges. Align the quarter pins of the neckband to the dress. Pin together.  
12. Sew neckband to dress, stretching ribbing to fit the neck.  DO NOT stretch neck opening.
 
 
Bury that tail!
 
13. Turn neckband and press.
 
 
14. Continue following steps 46-54 for Option C, to finish the skirt and attach the bodice. 
    • Finish the sleeves by hemming with a zigzag stitch, double needle, or finish with a cuff using the same technique we used for the neckband.
    •  Note: In Step 52 you may use a serger to attach the bodice and skirt since there is no zipper.     
 
Congratulations!!!! 
You have made an adorable new dress.
 
If you haven’t picked up your copy of the Foliis yet, go get it now, so you can make one of these to pair with your cropped jacket.  
 
Thanks for reading! I hope you give this a try.  


SALE

REGISTER FOR OUR NEWSLETTER

OR FOLLOW US